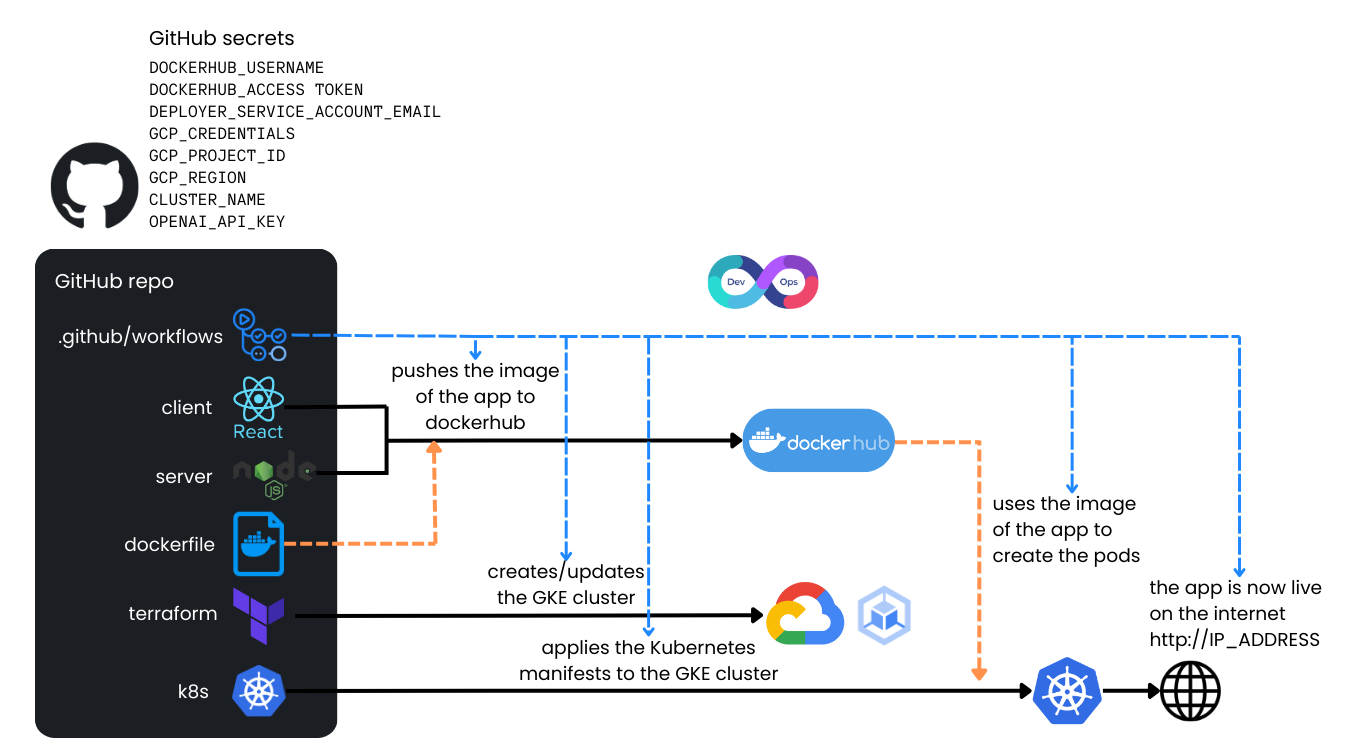
The cool thing about this project is not the chatbot itself—you can use it to deploy any type of app. With just one push of a button, you can have your own containerized application up and running on GCP in minutes, fully accessible online and automatically scalable with Kubernetes!
This repository is a complete example of how to deploy an application (in this case, a ChatGPT-based chatbot) to Google Cloud Platform (GCP) using:
- Node.js & React to build the application.
- Docker Hub to build the container images.
- GitHub Actions for CI/CD.
- Terraform to provision a GKE Autopilot cluster.
- Kubernetes manifests for deploying the containerized app on GKE to ensure scalable infrastructure.
Deployment
On every commit to the main branch, the workflow will:
- Check out the code.
- Build & push a Docker image to Docker Hub
- Provision or update the GKE Autopilot cluster using Terraform.
- Deploy the container image and Kubernetes manifests to that cluster.
- Wait for the external IP, then post a comment with the link to access the app.
- This means each time you push changes, the pipeline updates the GCP environment automatically.

Prerequisites
-
Google Cloud Account
-
Service Account
- In your GCP project, go to IAM & Admin > Service Accounts and create a service account with the following roles:
- Kubernetes Engine Admin (it needs to create/manage/update the cluster)
- Compute Viewer (it needs to see the default compute engine service account)
- Service Account Admin (it needs to grant itself access to the default compute engine service account)
- Service Usage Admin (it needs to enable the appropiate APIs)
- Click
DONE
- Generate a JSON key for this service account:
- Go to IAM & Admin > Service Accounts in the GCP Console.
- Click on the service account.
- Click Keys, then Add key > Create new key.
- Choose JSON and download the file. Save that JSON file locally; you’ll need its contents soon.
-
(Optional) Docker Hub Account
- If you want to build & push your own custom Docker image:
- Create a Docker Hub account if you don’t have one.
- Create a public repository (e.g.,
username/kubernetes-chatbot).
- Generate a Personal Access Token (in Account Settings > Security > New Access Token) with read, write, delete permissions.
- Copy and save the access token key; you’ll need it later.
- If you prefer not to push your own images, you can skip this. The workflow will use a default image from this repo’s Docker Hub (but that means you won’t see your changes if you modify the code).
Fork & Configure the Repository
-
Fork this repo into your own GitHub account.
-
Access the Secrets page:
In your forked repo, go to Settings > Secrets and variables > Actions.
Click New repository secret for each of the following variables, named exactly as shown.
Required Secrets
-
DEPLOYER_SERVICE_ACCOUNT_EMAIL
The email of the service account you created (e.g., my-service-account@my-project.iam.gserviceaccount.com).
-
GCP_CREDENTIALS
Paste the entire JSON file contents of your service account key into this secret.
-
GCP_PROJECT_ID
Your GCP project ID (e.g., my-awesome-project).
-
GCP_REGION
Choose a GCP region, e.g. europe-west1.
-
OPENAI_API_KEY
Your OpenAI API key (retrieve from OpenAI’s API page) so the chatbot can communicate with ChatGPT.
Optional Secrets
-
DOCKERHUB_USERNAME
Your Docker Hub username. (e.g., username).
-
DOCKERHUB_ACCESS_TOKEN
Your Personal Access Token password. (e.g., dckr_pat_xxxx...).
These are only needed if you want to build and push your own Docker image. If you skip them, the workflow will just deploy the default image.
Deploying the Architecture
-
Enable GitHub Actions
After setting all secrets, go to the Actions tab in your forked repo and enable workflows if prompted.
-
Commit to
main branch
Any commit or push to the main branch triggers the workflow. You can edit the README.md file and push the change (do a false commit).
-
Watch GitHub Actions
Go to Actions tab in your repo.
Click the latest workflow to see how the architecture is being built in real-time.
Click build_and_deploy
The first run may take up to 15 minutes (Terraform is creating the cluster).
-
Access the App
After completion, look for the step labeled ***Show External IP*** near the end of the workflow.
Click the link, and you’ll see the live chatbot (or your own custom app) hosted on GKE!
If the page doesn’t load immediately, wait a couple of minutes — it may take some time for the changes to fully propagate.
-
(Optional) Explore Your GKE Cluster
Visit the Google Cloud Console and navigate to Kubernetes Engine > Clusters.
There, you can inspect your deployed Autopilot GKE cluster.
Developing your own Custom App
-
Modify the Chatbot or Build a Different App
- If you want a custom Docker image with your code changes, provide the Docker Hub secrets.
- Commit your code changes to
main.
- The workflow rebuilds/pushes your Docker image to your Docker Hub repo and redeploys it to GKE within a few minutes.
-
No Docker Hub?
You can keep using the default image from this repo’s Docker Hub if you only want to deploy the existing code.
-
Modify the infrastructure
You can edit the Terraform and Kubernetes manifests to fit your needs, but doing so may require changes to the workflow.
Conclusion
That’s it! You now have a CI/CD pipeline that:
- Creates or updates a GKE cluster in your own GCP project.
- Deploys a Docker container (this chatbot by default, or your own).
- Exposes it to the internet behind a LoadBalancer.
Enjoy your scalable, auto-deployed app powered by Google Kubernetes Engine! If you have questions or run into any issues, feel free to open a discussion or look at the logs in the Actions tab for troubleshooting.
Happy Deploying!
— Alfonso Monserrat
